ROLE Usage for K2HR3 Web Application
This section explains how to operate ROLE using the K2HR3 Web Application.
Display of ROLE
If ROLE has not yet been registered in TENANT(when using the K2HR3 system for the first time), registration of ROLE is required first.
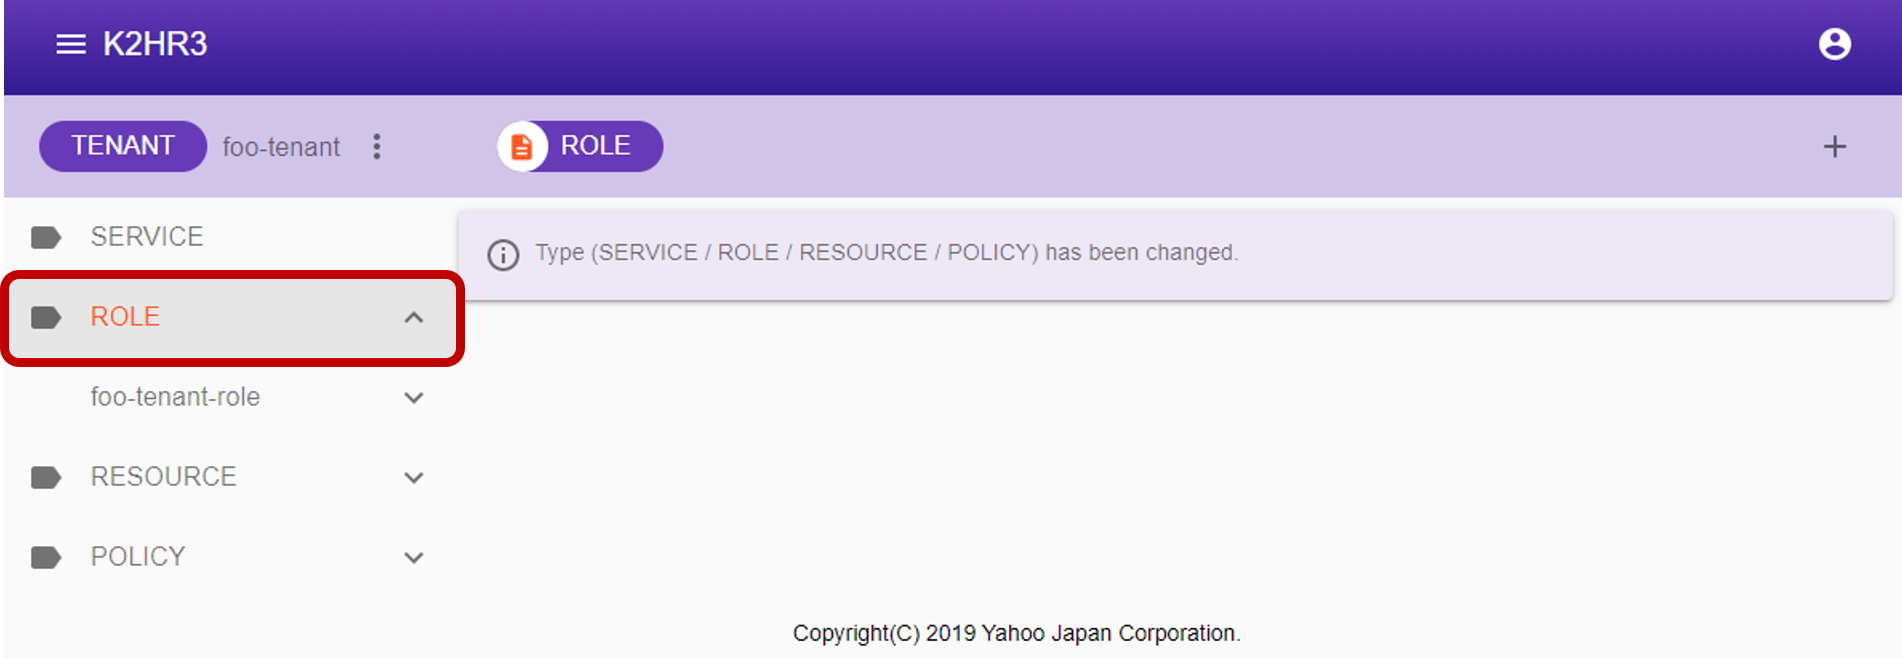
If ROLE data already exists, you can check registered ROLE by selecting ROLE in the left tree.
Registering ROLE
To register ROLE, select ROLE in the left tree, then click the  button next to [ROLE] at the top.
To register a hierarchical ROLE(ROLE with parent), select the existing ROLE to be made a parent from the left tree and click the button.
After clicking the button, a dialog for registering ROLE is displayed.
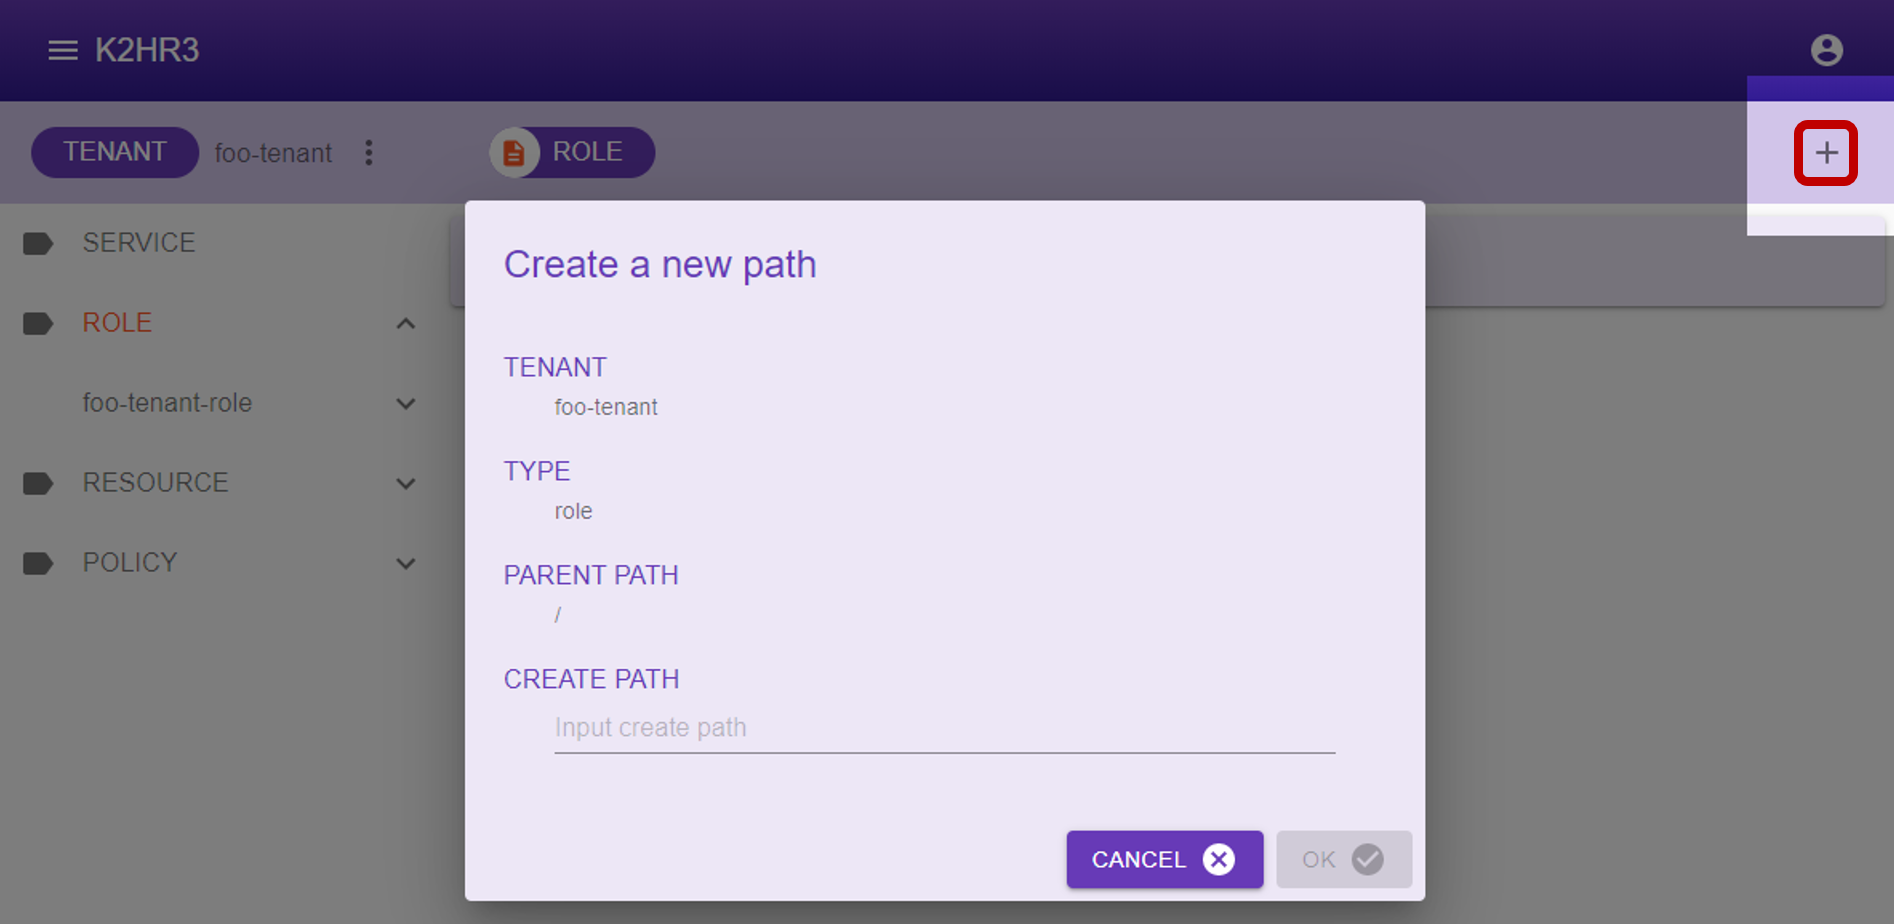
Enter the ROLE name in the displayed dialog and click the  button to register ROLE.
Items displayed in dialog and their contents are shown below.
- TENANT
The TENANT name for registering ROLE is displayed. - TYPE
“role” indicating that it is ROLE is displayed. - PARENT PATH
YRN path of the parent of ROLE to be registered is displayed.
In the case of ROLE of top level(without parent) which is not layered, ”/” is displayed.
When registering under the parent ROLE, YRN path of its parent ROLE is displayed.
For example, if you register ROLE under the ROLE name “toplevel”, “/toplevel” is displayed. - CREATE PATH
Enter the name of the ROLE to be registered.
After registered ROLE, you can see by deploying ROLE in the left tree.
Editing of ROLE
To edit the contents of already registered ROLE, first select ROLE to edit in the left tree.
After selection, the data of the ROLE data is displayed in the main area of K2HR3 Web Application.
You can directly edit, add, or delete this ROLE data.
After editing, you can save the ROLE data by clicking the  button.
To discard the editing, please click the
button.
To discard the editing, please click the  button.
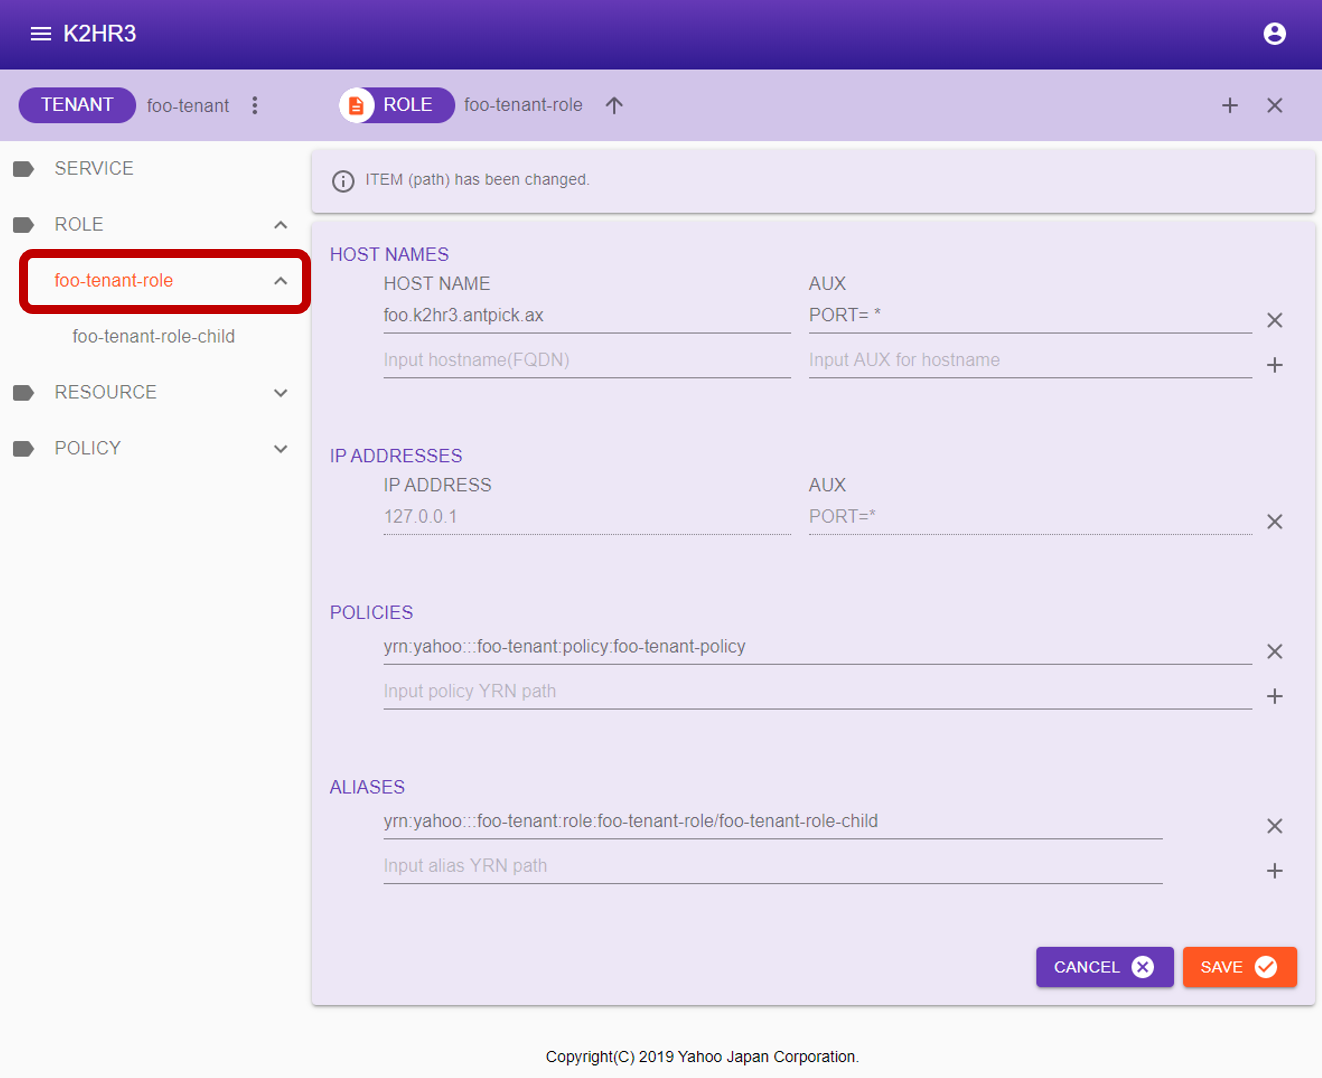
After selecting ROLE, the items displayed in the main area will be explained.
- HOST NAMES
The HOST expressed by the FQDN(hostname) registered as a member of ROLE is enumerated.- HOST NAME
The FQDN(hostname) is displayed. - AUX
Information set as Auxiliary Information(AUX) is displayed.
For AUX, please see Auxiliary Information (AUX).
- HOST NAME
- IP ADDRESSES
The HOST expressed by the IP address registered as a member of ROLE is enumerated.- IP ADDRESSE
The IP address is displayed. - AUX
Information set as Auxiliary Information(AUX) is displayed.
For AUX, please see Auxiliary Information (AUX).
- IP ADDRESSE
- POLICIES
YRN full path of POLICY-RULE registered in ROLE is listed.
Also when editing/adding POLICY-RULE, enter YRN full path. - ALIAS
The registered ALIAS is displayed.
ALIAS is displayed as YRN full path to other ROLE.
To edit/add as well, enter YRN full path.
Attribute information of ROLE
To display ROLE attribute information, first select ROLE in the left tree.
After selection, click  on the left side of [ROLE] to display the ROLE attribute information(Selected Path Information) dialog.
The attribute information of ROLE is displayed in this dialog.
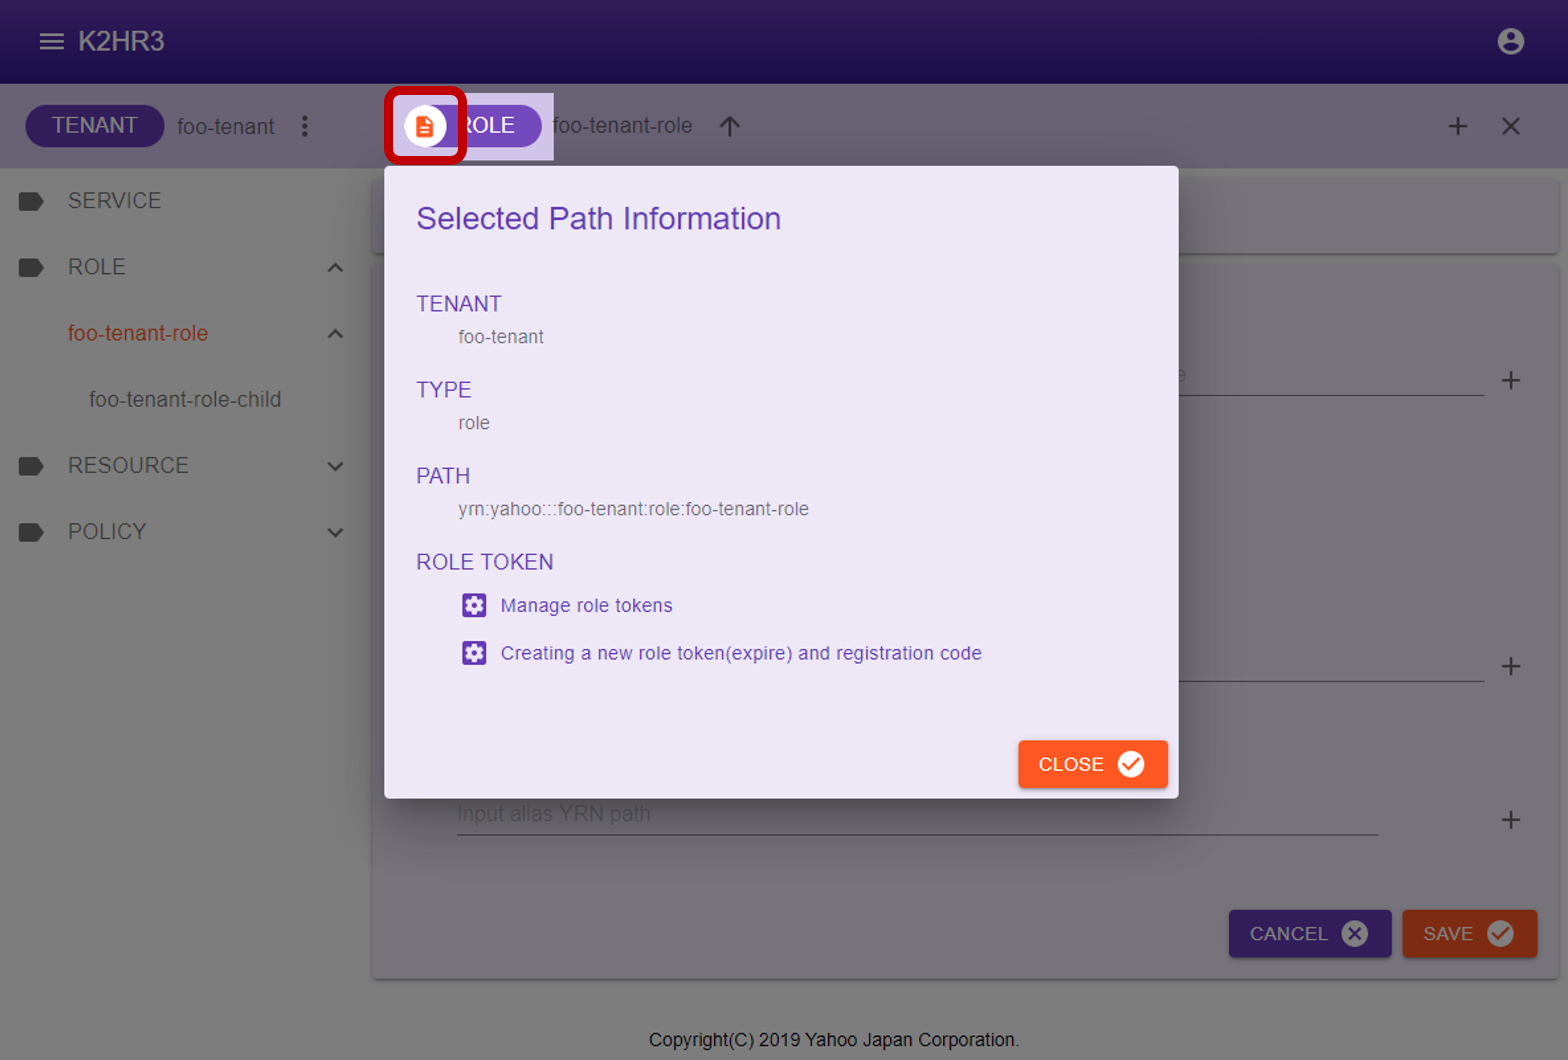
The following describes attribute information of ROLE.
- TENANT
Displays the TENANT name to which ROLE belongs. - TYPE
“role” is displayed. - PATH
YRN full path to this ROLE is displayed.
This YRN full path is used for input to ROLE ALIAS etc. - ROLE TOKEN
There are two buttons for managing ROLE TOKENs and for displaying details of the ROLE TOKEN and automatically registration codes for IaaS(OpenStack and kubernetes).
To manage ROLE TOKENs, click the Manage role tokens button.
To create a new role token and view the details of it and display the code for automatic registration to IaaS(OpenStack and kubernetes), Click the Creating a new role token(expire) and registration code button.
Manage ROLE TOKENs
Click Manage role tokens button in the ROLE attribute information(Selected Path Information) dialog, you can manage ROLE TOKENs.
In the Manage Role Tokens dialog shown below, you can check the list of ROLE TOKENs that have been issued for the target ROLE.
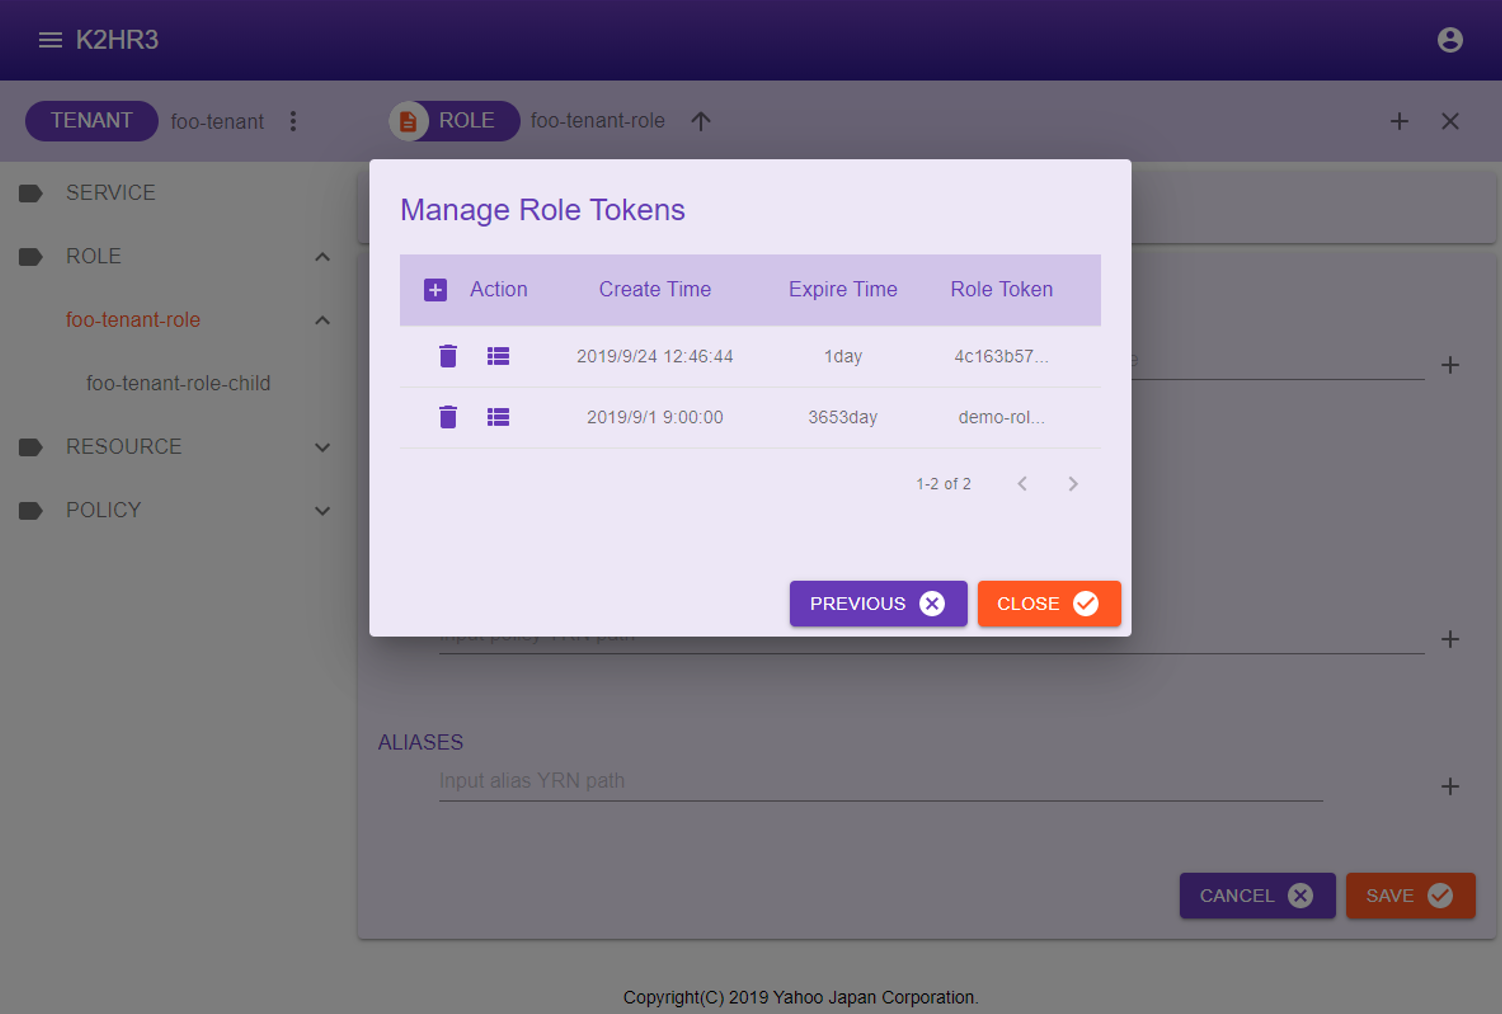
This dialog has  create a new ROLE TOKEN button,
  delete a ROLE TOKEN button, and
  display detail of ROLE TOKEN and automatically registration codes for IaaS(OpenStack and kubernetes) button.
The operation of each button is shown below.
Create a new ROLE TOKEN
You can issue a new ROLE TOKEN by clicking the Create a new ROLE TOKEN button.
You can specify a new ROLE TOKEN to be either expiration date(default 24 hours) or indefinite(10 years).
The expiration date can be set in the K2HR3 Web Application config.
When this button is clicked, the following pop-up is displayed.
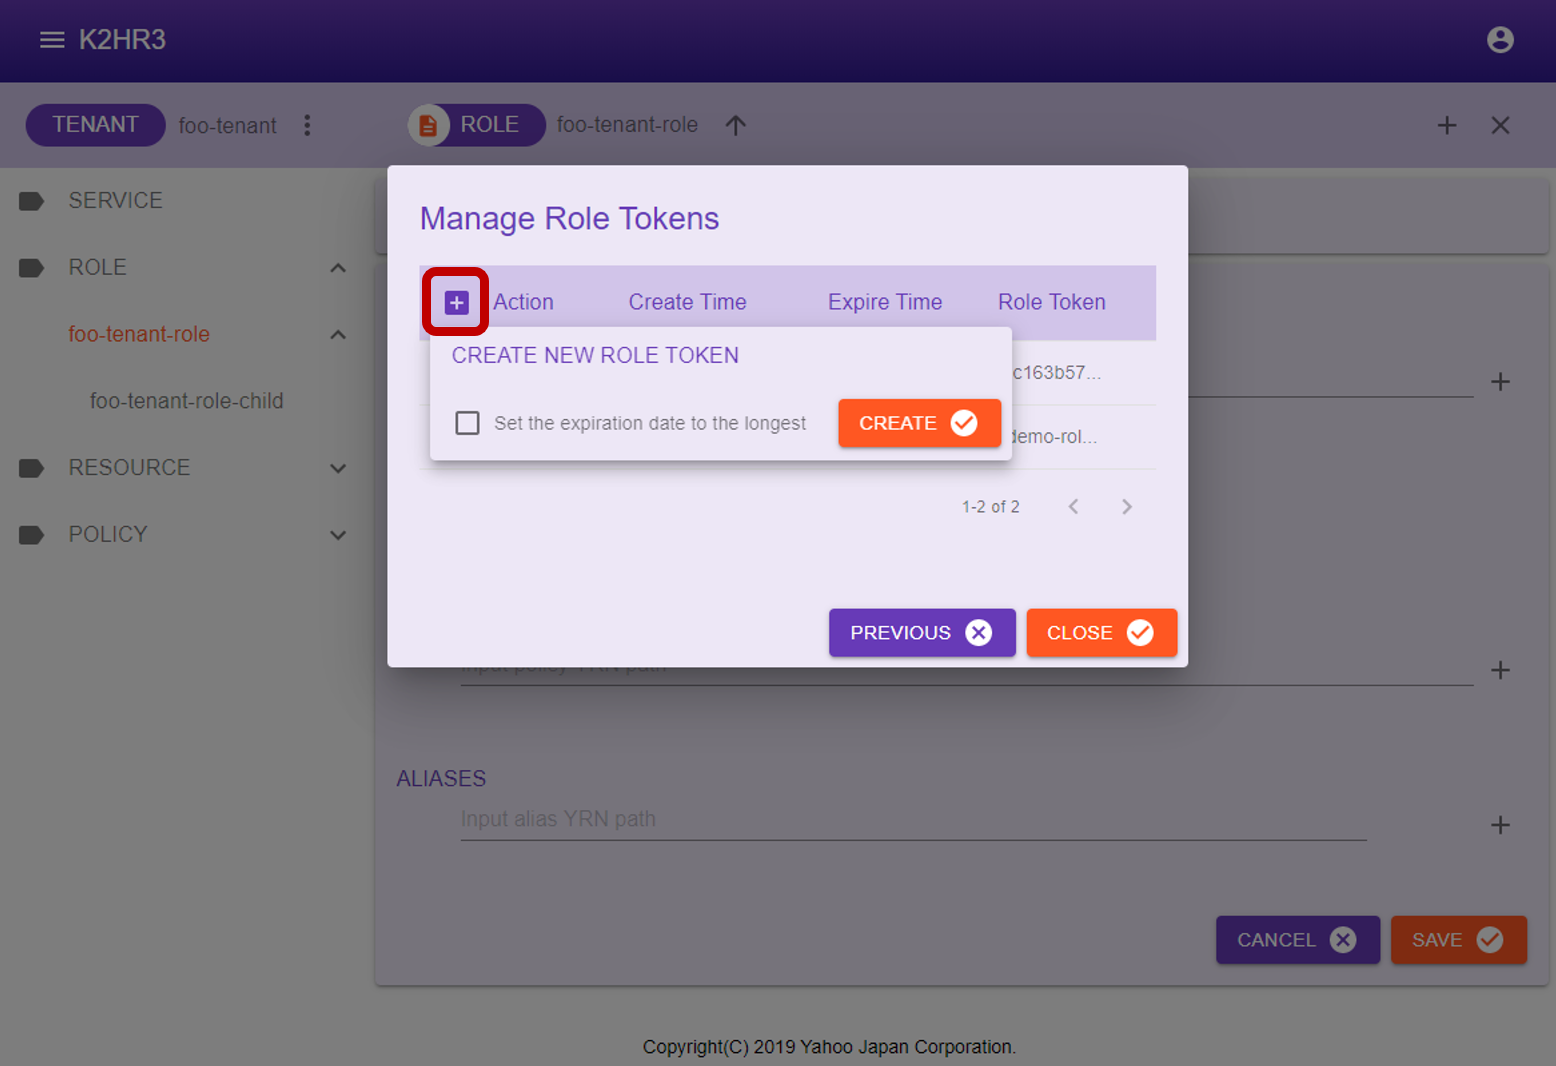
Click  button in this popup to create a new ROLE TOKEN.
Immediately after a new creation, the created ROLE TOKEN is displayed in bold at the top of the Manage Role Tokens dialog.
Delete a existing ROLE TOKEN
You can delete(disable) a ROLE TOKEN by clicking button in the ROLE TOKEN column.
To display datail of ROLE TOKEN and automatically registoration codes
Click button in the ROLE TOKEN column to display the details of ROLE TOKEN and the code for automatic registration for IaaS(OpenStack and kubernetes).
Role Token / Registration code
Creating a new role token(expire) and registration code button in the ROLE attribute information(Selected Path Information) dialog, or click button on the Manage ROLE TOKENs dialog page to display this dialog page.
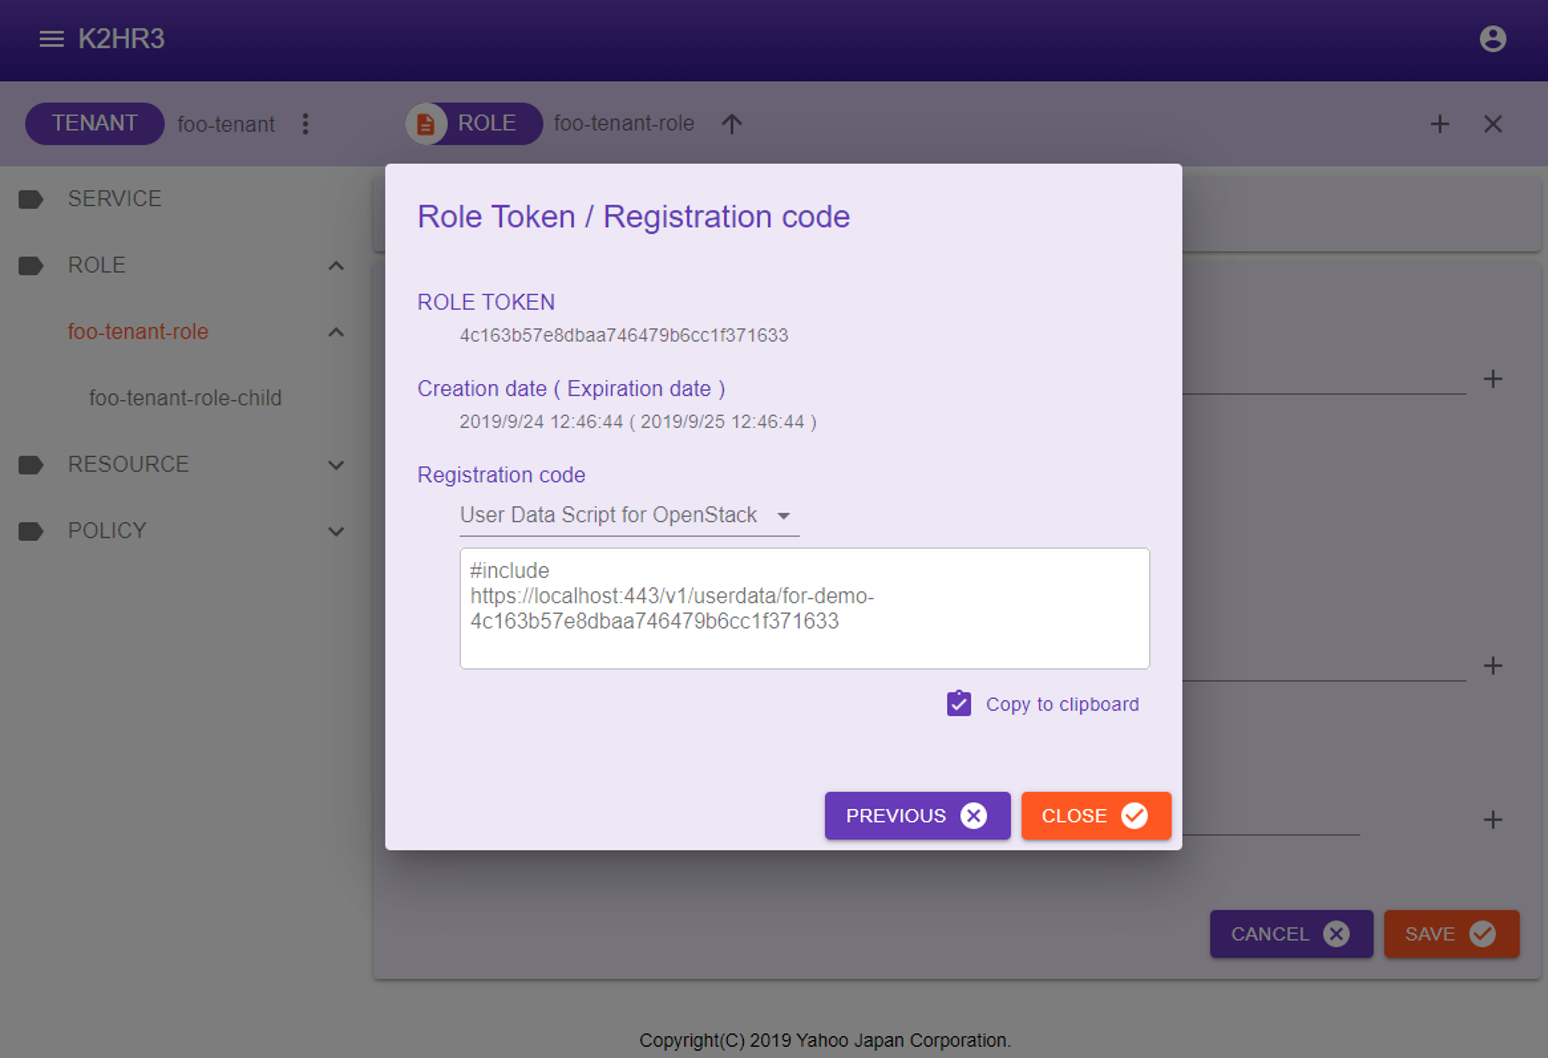
The following items are displayed on this dialog page.
ROLE TOKEN
A ROLE TOKEN is displayed.(All character strings are displayed.)
You can specify this TOKEN when using the K2HR3 REST API.
For details, please refer to K2HR3 REST API.
Creation date ( Expiration date )
The date and time when the ROLE TOKEN was created and its expiration date are displayed.
Registration code
Displays information on the automatic registration code for IaaS(OpenStack and kubernetes) using this ROLE TOKEN, and Custom Registration Code(CRC) specified by user.
There are the following types of automatic registration codes to be displayed according to IaaS(OpenStack and kubernetes).
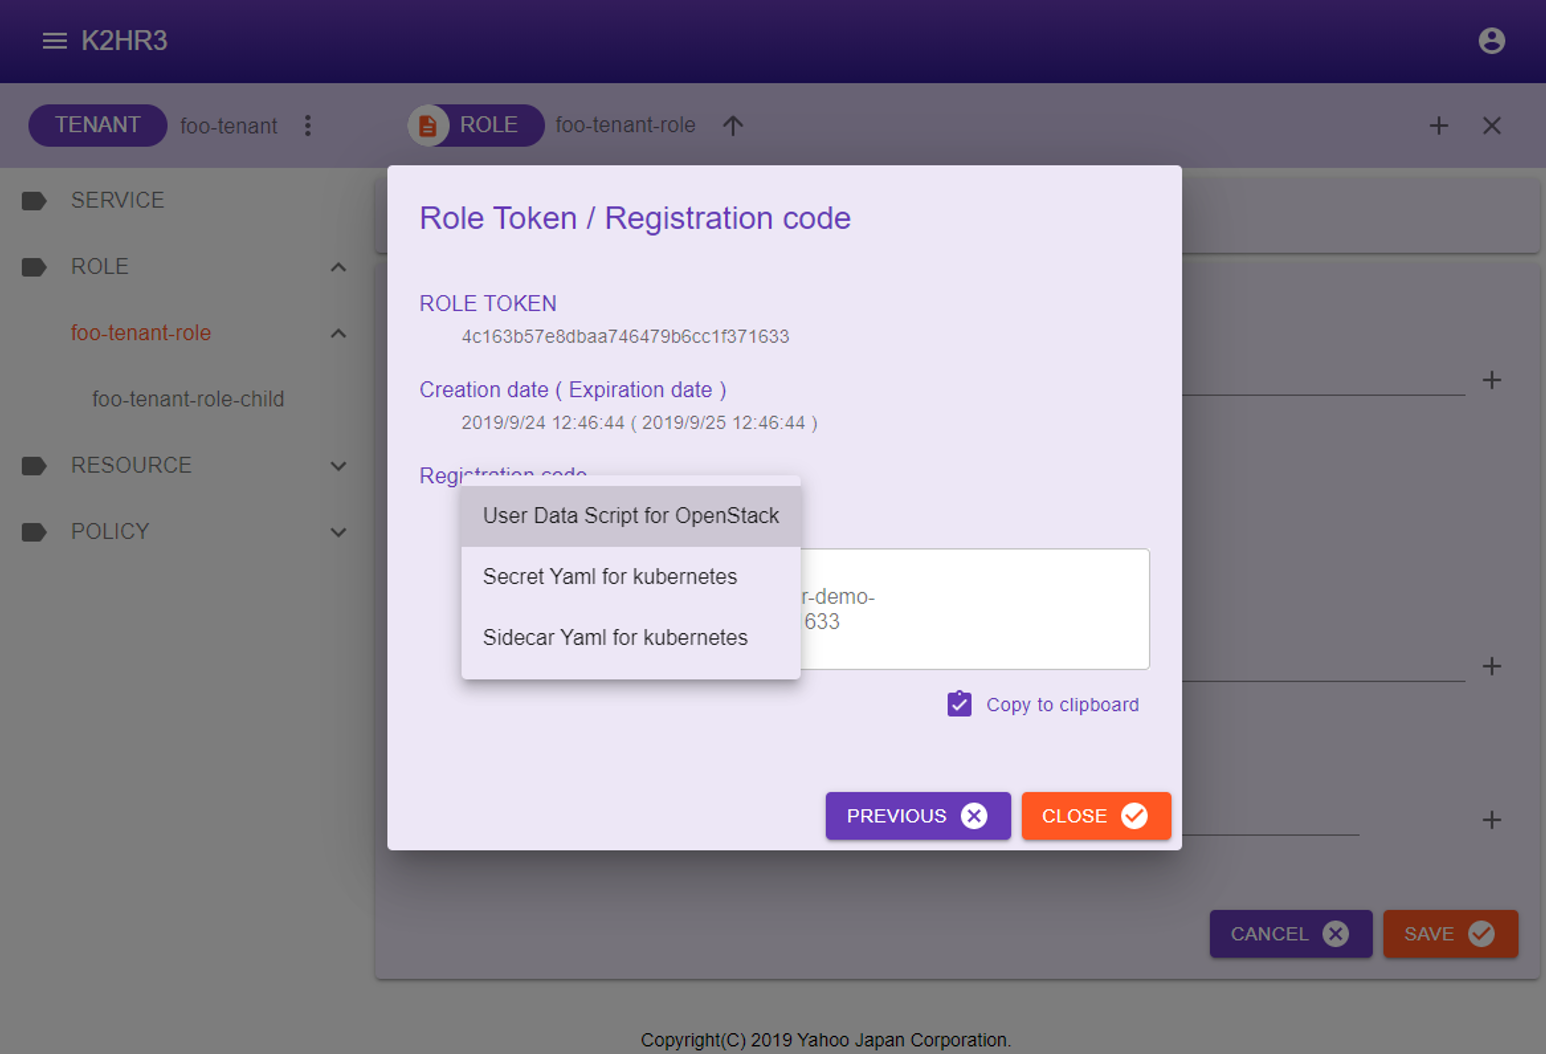
- User Data Script for OpenStack
USER DATA SCRIPT for automatic registration of OpenStack Virtual Machine(VM) is displayed.
This usage is described below. - Secret Yaml for kubernetes
When registering kubernetes Pods(Containers) automatically, the K2HR3 system requires Secret for kubernetes.
The Yaml contents which is a template for registering this Secret is displayed.
You can modify this yaml template according to the environment and register Secret.
This usage is described below. - Sidecar Yaml for kubernetes
When registering kubernetes Pods(Containers) automatically, the K2HR3 system runs a lightweight Sidecar dedicated to K2HR3 on Pods.
The Yaml contents is displayed as a template to register this Sidecar.
You can modify this yaml template according to the environment and start Sidecar.
This usage is described below.
In addition to the above, if a Custom Registration Code(CRC) has been set in configuration, all Custom Registration Code(CRC) will be displayed as well.
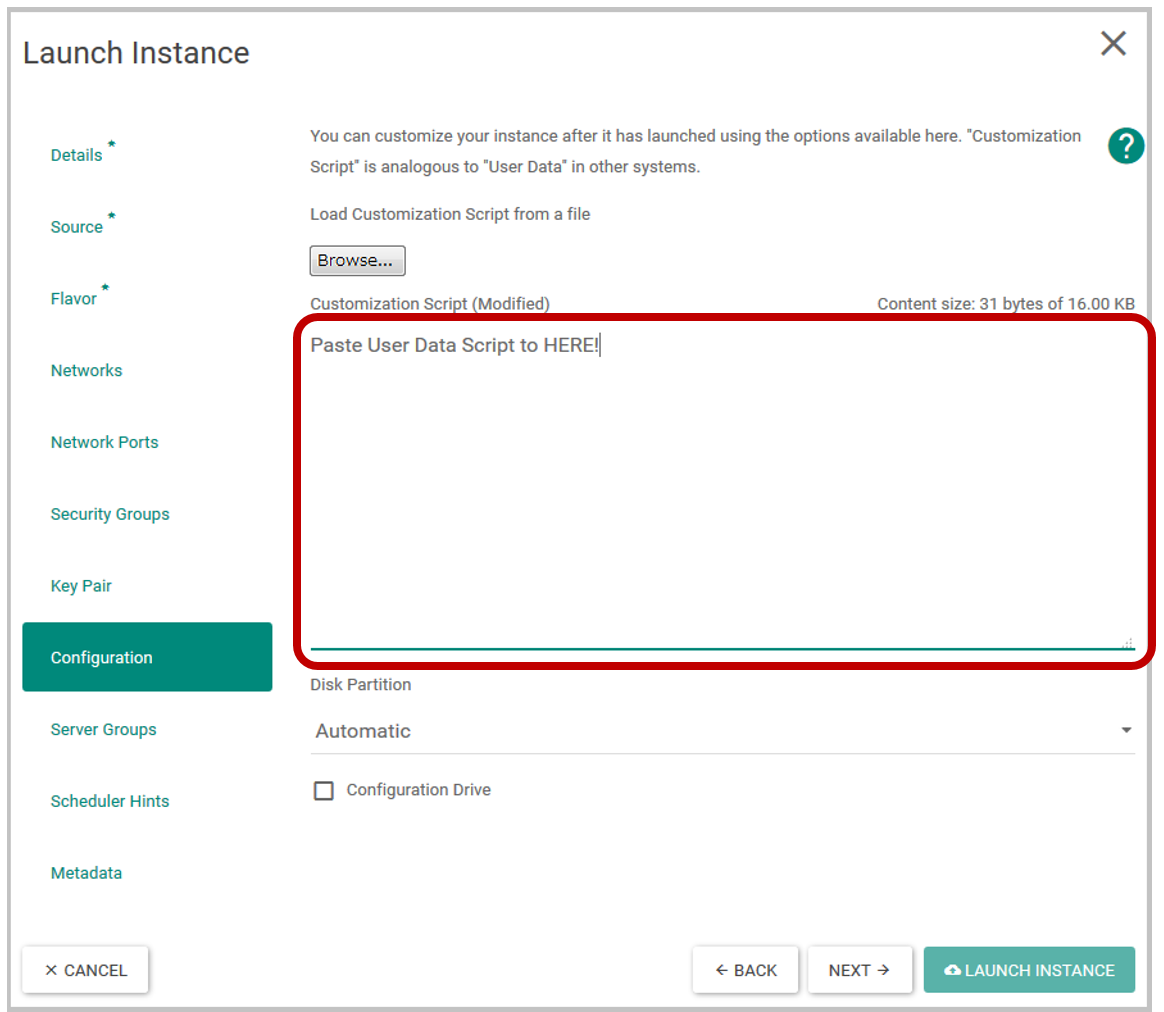
How to use USER DATA SCRIPT for OpenStack
This section describes how to automatically register an OpenStack Virtual Machine(VM) as a ROLE member.
You can display USER DATA SCRIPT by selecting User Data Script for OpenStack on the Role Token / Registration code dialog page described above.
This USER DATA SCRIPT can be copied using the  Copy to Clipboard button.
Specify this USER DATA SCRIPT when launching an OpenStack Virtual Machine(VM).
As a result, when the Virtual Machine(VM) starts up, its IP address is registered as a member of this ROLE automatically.
The following is a dialog for specifying USER DATA SCRIPT of OpenStack. (The page varies slightly depending on the version of OpenStack.)
How to use Yaml templates for kubernetes
This section explains how to automatically register kubernetes Pods(Containers) as ROLE members.
Select Secret Yaml for kubernetes and Sidecar Yaml for kubernetes in Role Token / Registration code dialog page above and copy their yaml contents.
You can copy these Yaml templates with the Copy to Clipboard button.
Secret Yaml template
The yaml contents displayed in Secret Yaml for kubernetes is a sample(template) code for registering k2hr3-secret as Secret in kubernetes.
In K2HR3 system, ROLE TOKEN is stored in Secret of kubernetes.
The following yaml code is displayed. You can modify namespace etc. according to your environment, and create Secret using kubectl etc.
apiVersion: v1
kind: Secret
metadata:
  name: k2hr3-secret
  namespace: <input your name space>
type: Opaque
data:
  K2HR3_ROLETOKEN: ****************************************************
The following is an example of a command that creates Secret.
$ kubectl create --save-config -f secret.yaml
Sidecar Yaml template
The contents displayed in Sidecar Yaml for kubernetes is a sample(template) code for starting Sidecar dedicated to K2HR3 when kubernetes Pods(Containers) is started.
** Sidecar** dedicated to K2HR3 registers k2hr3-volume as volume and runs k2hr3-sidecar as sidecar container.
You can modify this yaml template code to suit your environment and use it to run Pods(Conatiners).
The yaml template code contains the minimum necessary K2HR3 specific Sidecar yaml code.
** Sidecar** for K2HR3 uses docker.io/antpickax/k2hr3.sidecar image which is minimum ALPINE image.
If you can create Secret and run Sidecar for K2HR3, kubernetes Pods(Containers) will automatically be registered as members of this ROLE.
App Policy-Rule Web Application App Service