RANCHER Helm Chart
The K2HR3 Helm Chart is a Helm Chart for building a K2HR3 system using Helm(The package manager for Kubernetes) in a kubernetes environment.
This K2HR3 Helm Chart can be used as RANCHER Helm Chart from RANCHER.
Overview
You can register K2HR3 Helm Chart as RANCHER Helm Chart into the repository in the RANCHER.
Then you can easily build up your K2HR3 system from the chart registered in the RANCHER repository.
K2HR3 Helm Chart is published as a Chart repository at K2HR3 Helm Chart repository and Artifact Hub.
Using the RANCHER UI, you can register the K2HR3 Helm Chart published in Artifact Hub as a repository.
The source code for the K2HR3 Helm Chart is available on k2hr3_helm_chart - Github.
Using Helm command
The K2HR3 Helm Chart can be used as a regular Helm Chart.
If you want to use helm command for K2HR3 Helm Chart, please refer to here.
Use with RANCHER
The procedure for using K2HR3 Helm Chart RANCHER which is multi-cluster orchestration platform for kubernetes is explained below.
The following explanation assumes that the RANCHER environment has been set up.
Please refer to RANCHER for the setup.
Cluster in RANCHER
Determine the cluster of RANCHER on which to deploy the K2HR3 system by K2HR3 Helm Chart.
You create a cluster as needed.
The following figure logs in to the RANCHER UI and displays a list of clusters.
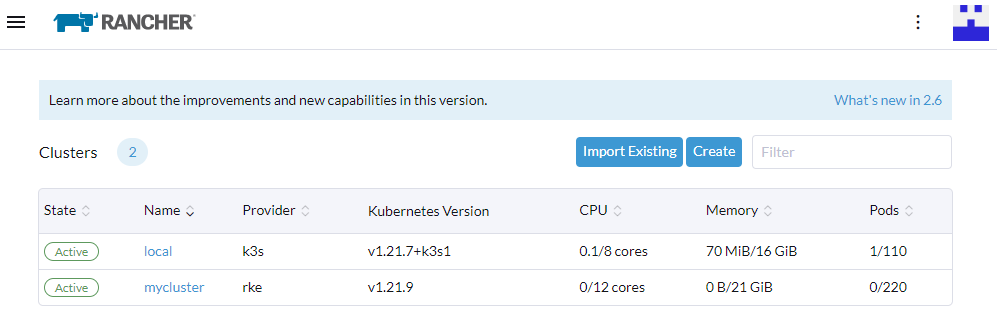
The following steps will be described using mycluster.
Add repository
Select the RANCHER cluster(mycluster) to display the cluster setting page.
Select Apps & Marketplace > ` Repositories` in the left pane to display the content shown below.
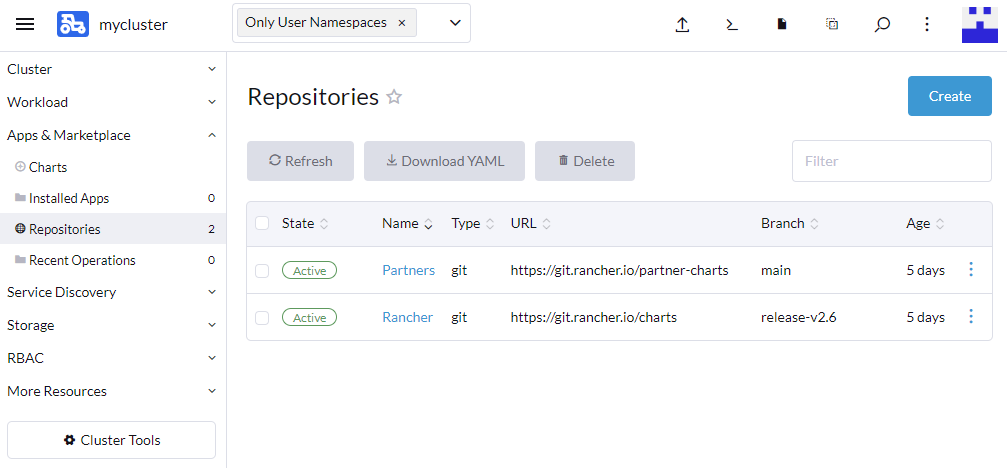
Click the Create button on this page to register the K2HR3 Helm Chart as a repository.
Click the Create button to display the Repository: Create page shown below.
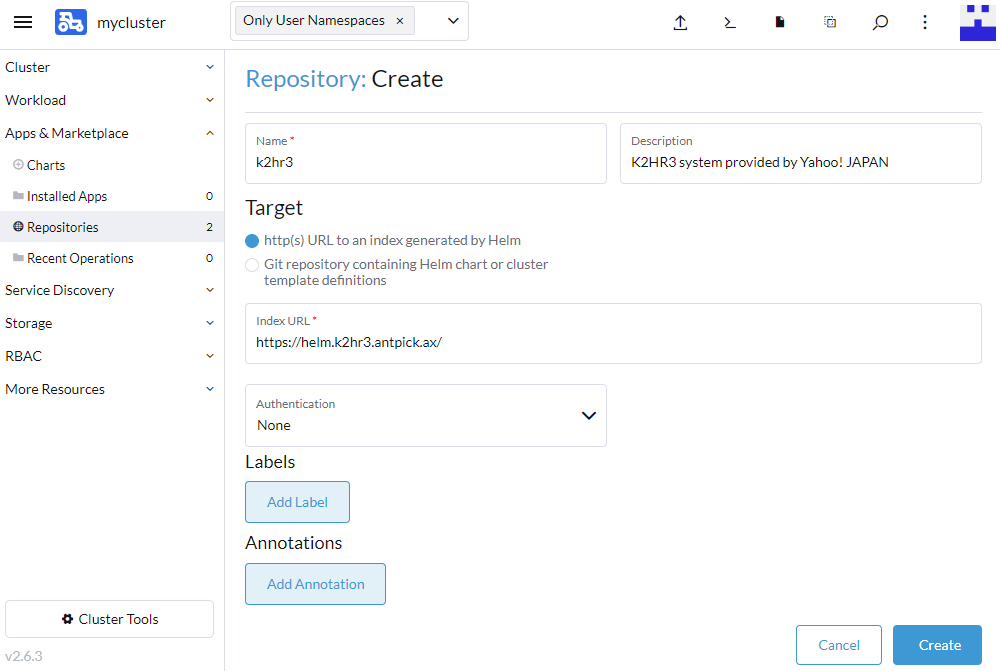
In order to register K2HR3 Helm Chart as a repository, set the values in the following items(required).
- Name
Please inputk2hr3. - Target
Selecthttp(s) URL to an index generated by Helm. - index URL
Enterhttps://helm.k2hr3.antpick.ax/.
After setting the above values, click the Create button in this page.
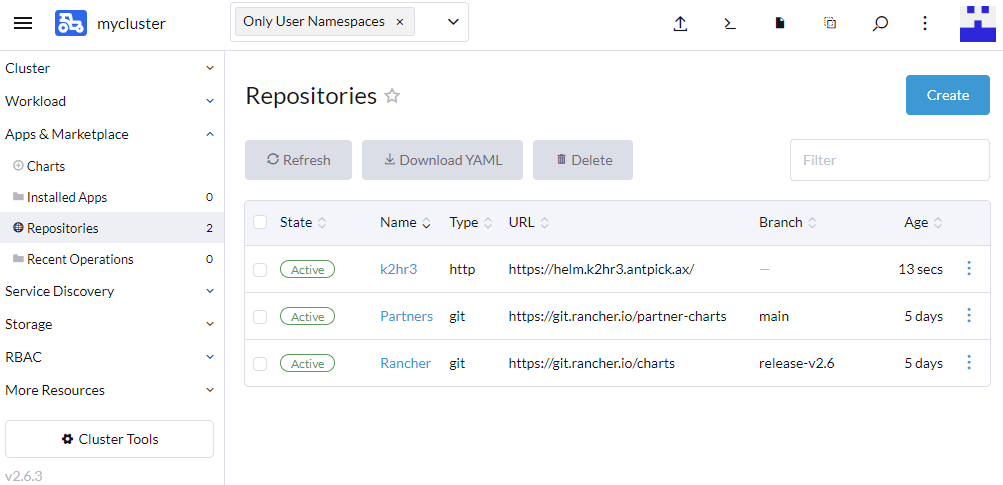
Now, as shown above K2HR3 Helm Chart has been registered as a RANCHER repository.
Chart installation
Then install K2HR3 Helm Chart.
Select Apps & Marketplace > Charts in the left pane to see a list of available Charts.
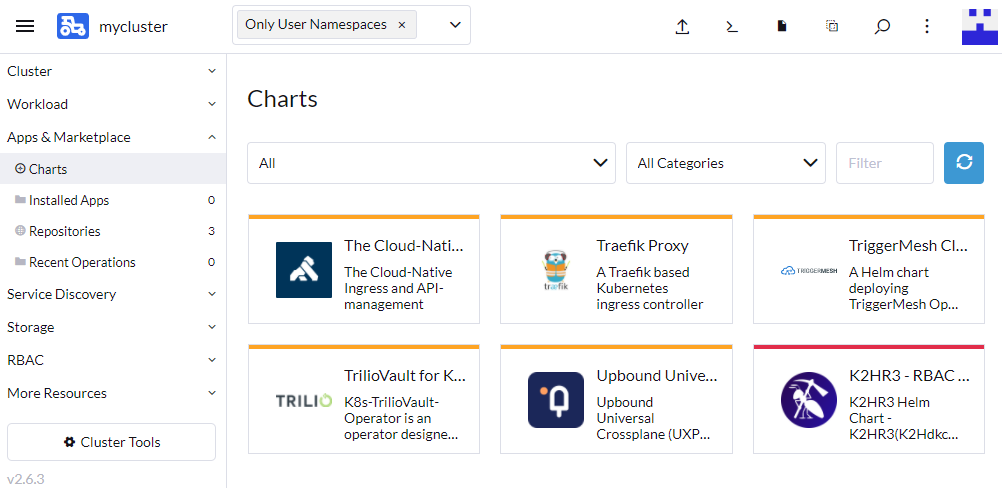
You can find the K2HR3 in this Chart list.
Clicking on the K2HR3 in the list will take you to a page where you can install the K2HR3 Helm Chart.
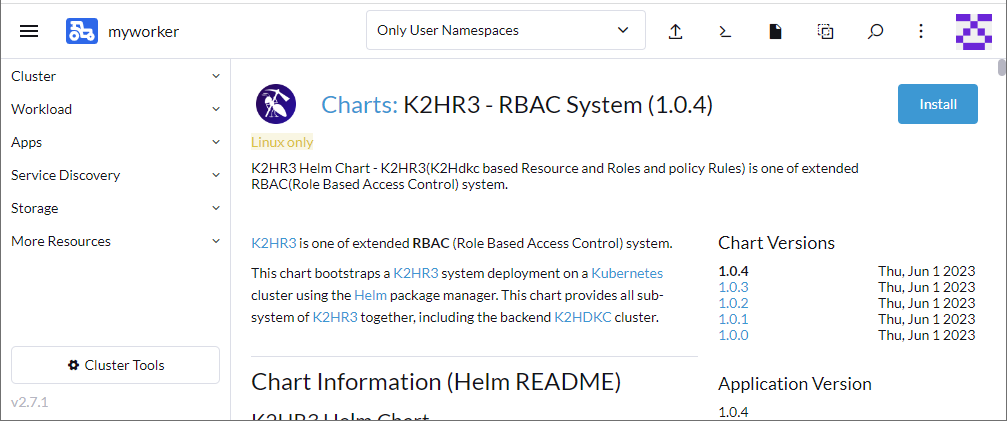
Click the Install button in the upper right to next step.
Chart Install : Step 1
The Install: Step 1 page is displayed as shown below.
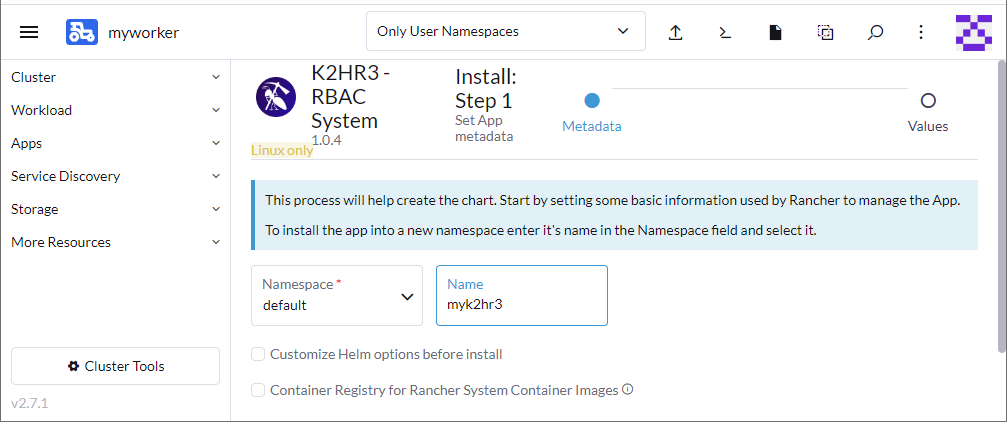
In this step 1, enter the Name of the K2HR3 system you want to install.
In the above example, myk2hr3 is entered for Name.
After entering Name, click the Next button.
Chart Install : Step 2
The Install: Step 2 page is displayed as shown below.
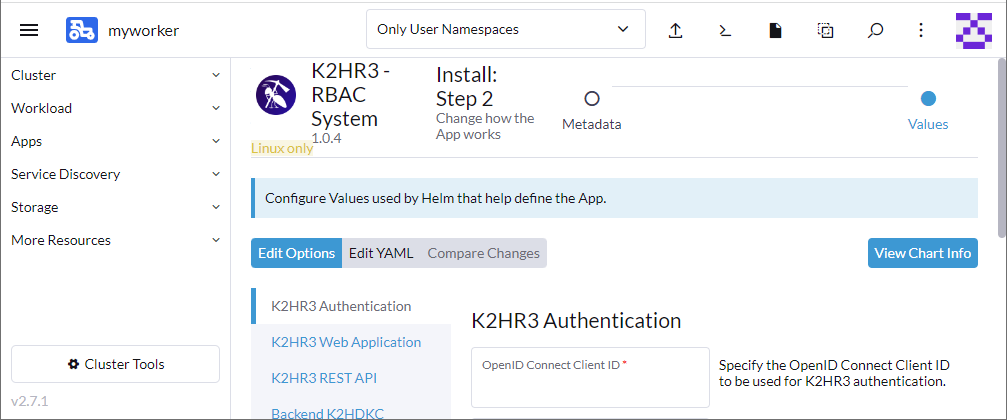
In this step, set the following items:
- K2HR3 System Authentication
- K2HR3 Web Application(subsystem)
- K2HR3 REST API(subsystem)
- Backend K2HDKC Cluster(backend system)
- PROXY Environments
Each setting items is explained below.
K2HR3 Authentication
On the Install: Step 2 page, select Edit Option and then K2HR3 Authentication from the list.
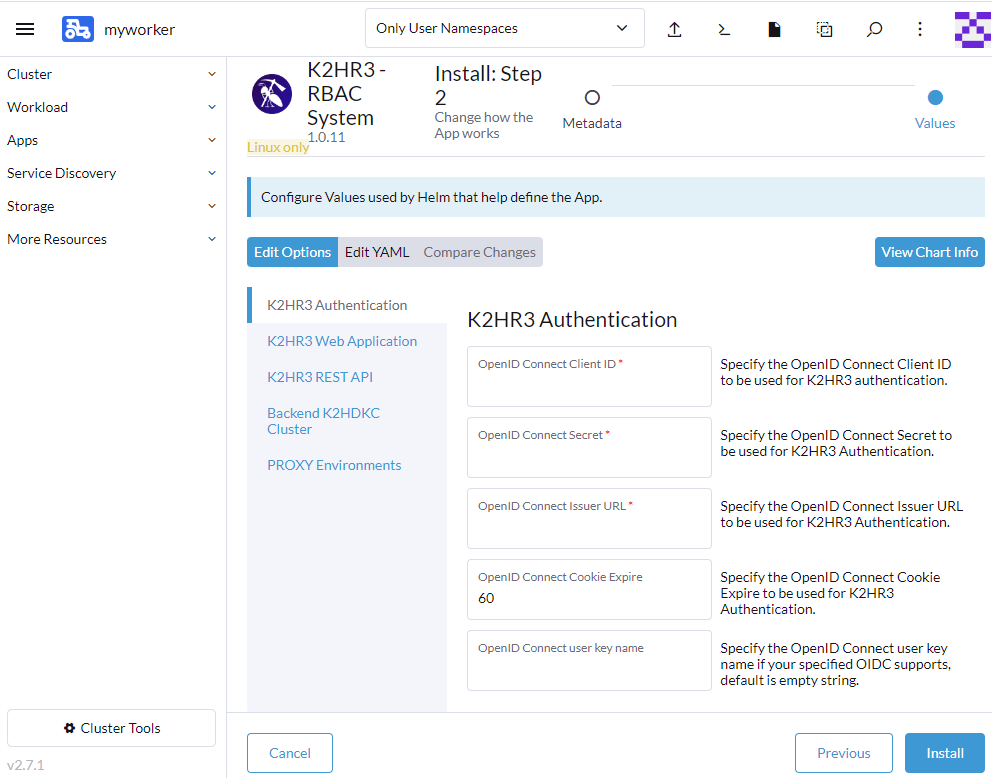
The K2HR3 System Authentication supported by the K2HR3 Helm Chart is only OpenID Connect.
In this K2HR3 Authentication setting, enter the OpenID Connect information used by the K2HR3 System.
The following items are required to be set:
- OpenID Connect Client ID
- OpenID Connect Secret
- OpenID Connect Issuer URL
After entering the required items, the setting of this K2HR3 Authentication item is completed.
K2HR3 Web Application
On the Install: Step 2 page, select Edit Option and then K2HR3 Web Application from the list.
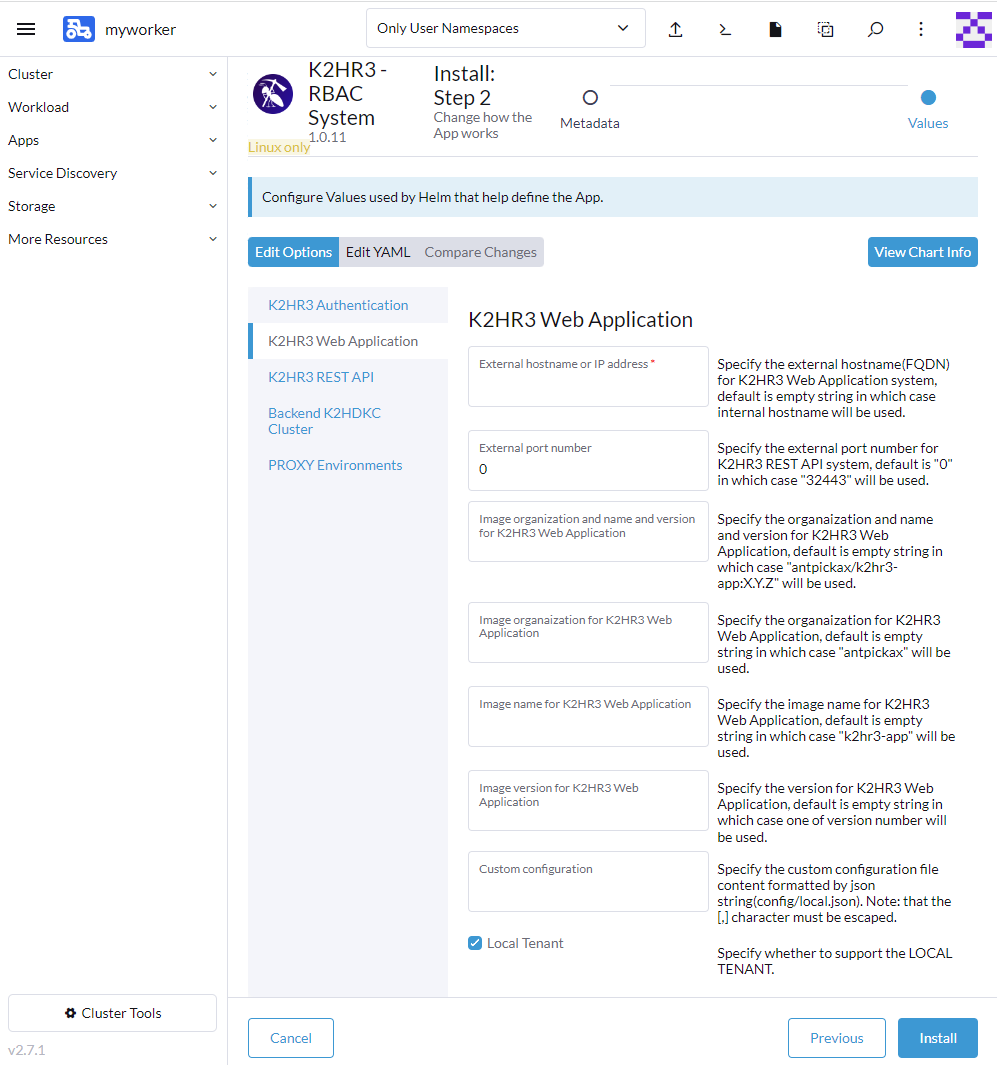
In this setting, enter the information for K2HR3 Web Application which is one of the K2HR3 subsystem.
The following items are required to be set:
- External hostanme or IP address
Enter the Hostname(FQDN) or IP address to access the K2HR3 Web Application.
The K2HR3 Web Application is configured as a NodePort kubernetes service.
Therefore, set this value to one of the Worker nodes that make up the RANCHER cluster(mycluster) that builds the K2HR3 system.
Alternatively, set the Hostname that can reach this NodePort service according to the environment.
K2HR3 Helm Chart uses the latest Docker image for K2HR3 Web Application at the time of release.
By default, the image antpickax/k2hr3-app:X.Y.Z is used.
This page allows you to change this Docker image to any image.
When changing images, you can set the organization name, image name, and image tag all at once, or specify them individually.
If you want to change the default settings of K2HR3 Web Application, you can specify Custom Configuration field as local.json to overwrite default configuration.
This value is specified by JSON String.
You can specify whether K2HR3 Web Application supports LOCAL TENANT.
If you don’t support it, uncheck the Local Tenant checkbox.
After entering the required items, the setting of this K2HR3 Web Application item is completed.
K2HR3 REST API
On the Install: Step 2 page, select Edit Option and then K2HR3 REST API from the list.
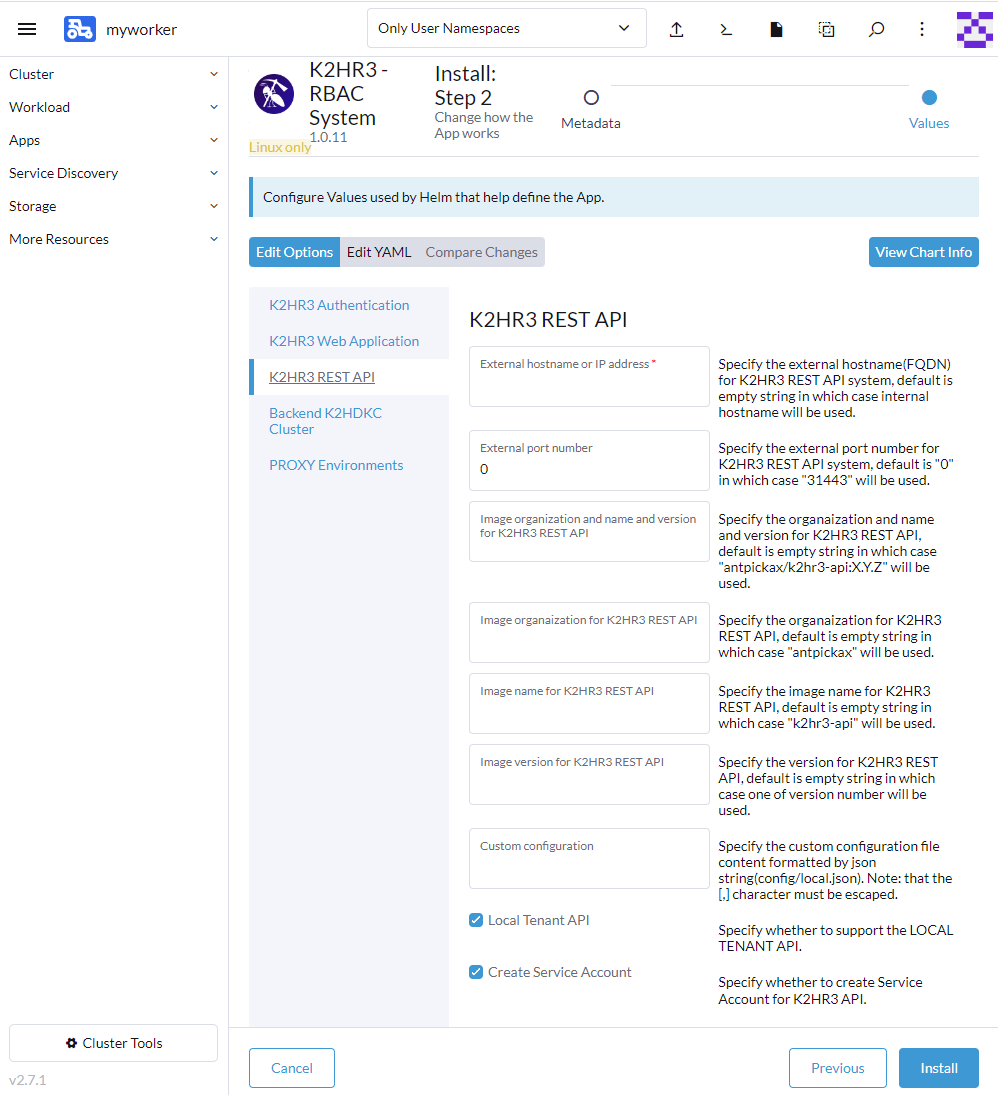
In this setting, enter the information for K2HR3 REST API which is one of the K2HR3 subsystem.
The following items are required to be set:
- External hostanme or IP address
Enter the Hostname(FQDN) or IP address to access the K2HR3 REST API.
The K2HR3 REST API is configured as a NodePort kubernetes service.
Therefore, set this value to one of the Worker nodes that make up the RANCHER cluster(mycluster) that builds the K2HR3 system.
Alternatively, set the Hostname that can reach this NodePort service according to the environment.
K2HR3 Helm Chart uses the latest Docker image for K2HR3 REST API at the time of release.
By default, the image antpickax/k2hr3-api:X.Y.Z is used.
This page allows you to change this Docker image to any image.
When changing images, you can set the organization name, image name, and image tag all at once, or specify them individually.
If you want to change the default settings of K2HR3 REST API, you can specify Custom Configuration field as local.json to overwrite default configuration.
This value is specified by JSON String.
You can specify whether K2HR3 REST API supports LOCAL TENANT.
If you don’t support it, uncheck the Local Tenant checkbox.
In K2HR3 Helm Chart, K2HR3 system cooperates with Kubernetes and its Namespace is used as a tenant.
Create a Service Account as you will need permission to access this Namespace as default.
If you do not need this Service Account, uncheck the Create Service Account checkbox.
After entering the required items, the setting of this K2HR3 REST API item is completed.
Backend K2HDKC Cluster
On the Install: Step 2 page, select Edit Option and then Backend K2HDKC Cluster from the list.

In this setting, enter the information for K2HDKC Cluster which is back-end system of the K2HR3 subsystem.
There are no required fields in this setting.
This setting allows you to specify the K2HDKC and CHMPX images used by the K2HR3 system.
You can also specify the Init Container image for initialization used in the entire K2HR3 system.
Normally, you can leave these values unset and use the default values.
K2HR3 Helm Chart uses the latest Docker image for K2HDKC and CHMPX and OS Image for Init Container at the time of release.
By default, each image antpickax/k2hdkc:X.Y.Z and antpickax/chmpx:X.Y.Z and alpine:X.Y.Z is used.
This page allows you to change this Docker image to any image.
When changing images, you can set the organization name, image name, and image tag all at once, or specify them individually.
After entering the required items, the setting of this Backend K2HDKC Cluster item is completed.
PROXY Environments
On the Install: Step 2 page, select Edit Option and then PROXY Environments from the list.
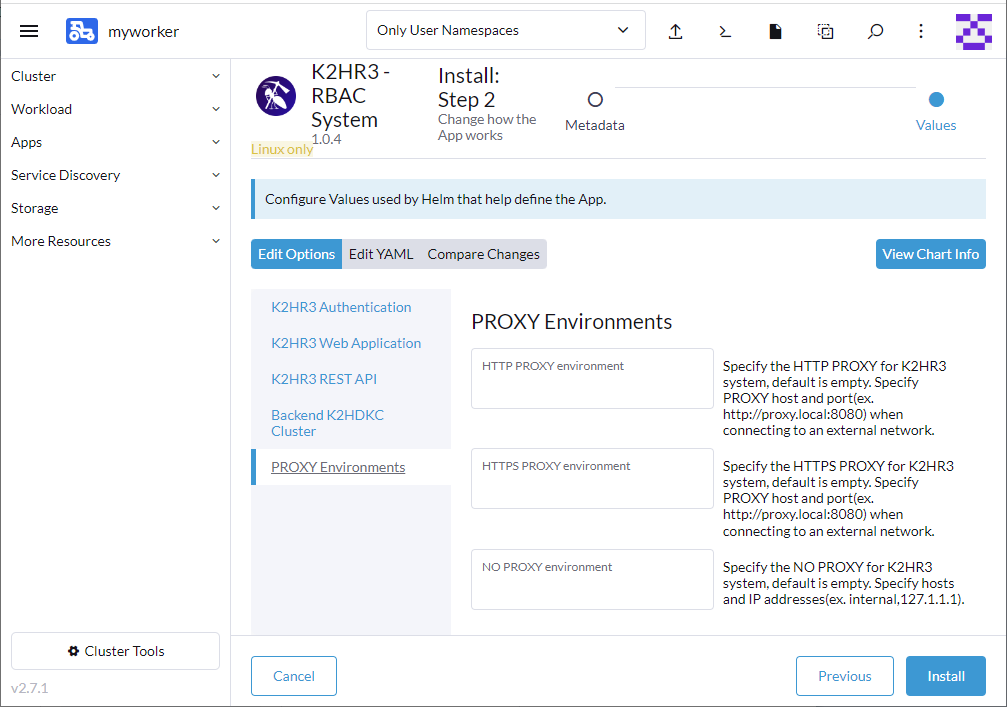
In this setting, enter the PROXY environments for All K2HR3 System.
By default, the RPOXY environment variables are not set.
If PROXY setting is required in the network where K2HR3 system is built, please specify HTTP_PROXY, HTTPS_PROXY and NO_PROXY environment variables.
After entering the required items, the setting of this PROXY environments are completed.
After completing the above Install: Step 2 settings, click the Install button at the bottom right.
Chart installed
The installation of K2HR3 Helm Chart will start, and when it is completed, the following screen(Apps & Marketplace > Installed Apps) will be displayed.
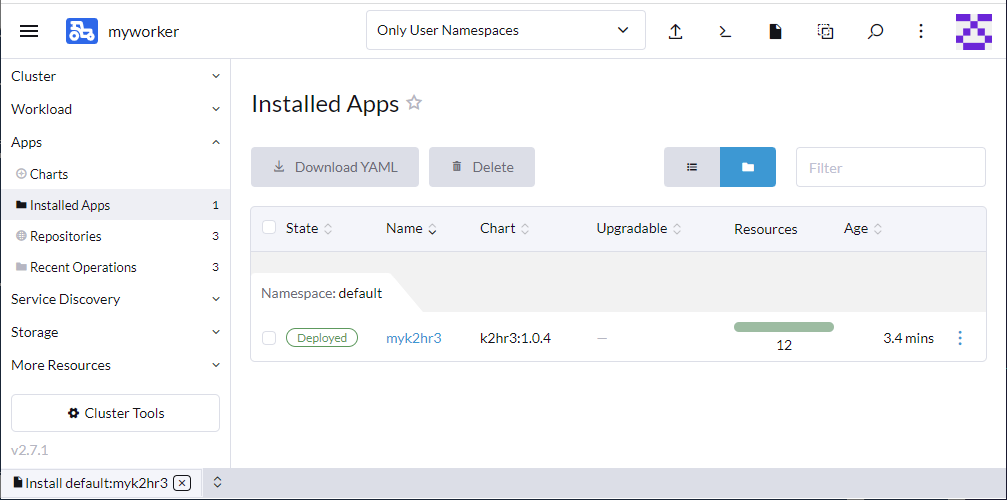
If you see the Deployed badge, you have successfully installed your K2HR3 system.
Deployments
Displays the Deployments installed by the K2HR3 Helm Chart.
In the left pane, select Workload > Deployments to confirm.
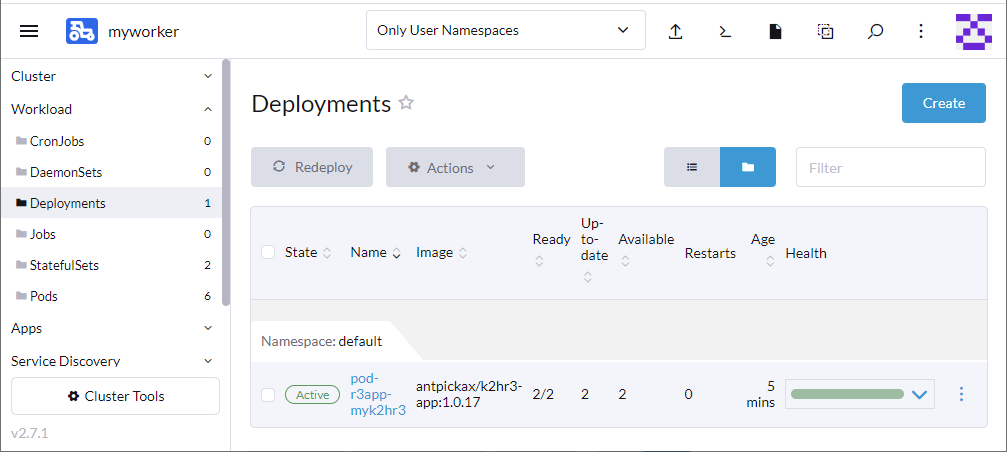
If you see pod-r3app-myk2hr3(case of Name=myk2hr3) and the Active badge, then Deployments is successful.
StatefulSets
Displays the StatefulSets installed by the K2HR3 Helm Chart.
In the left pane, select Workload > StatefulSets to confirm.
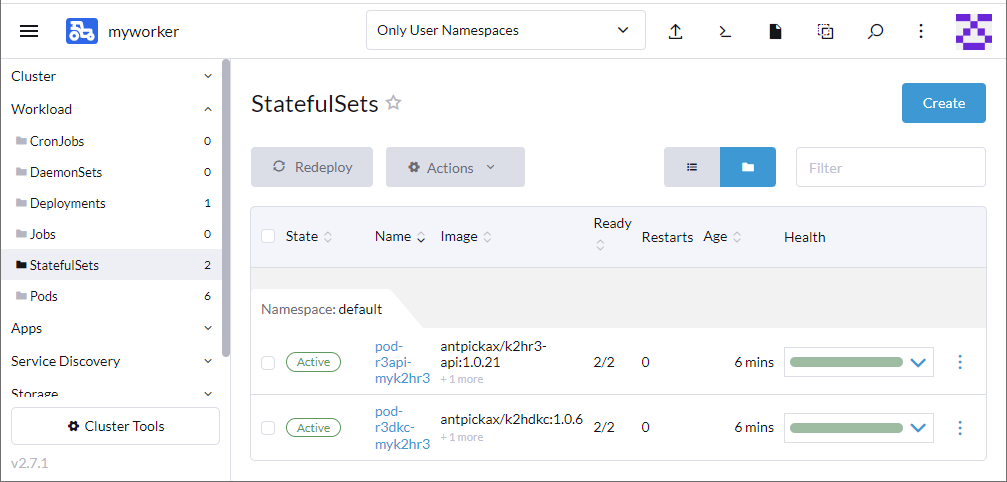
If you see pod-r3api-myk2hr3 and pod-r3dkc-myk2hr3(case of Name=myk2hr3) and the Active badge on the both of them, then StatefulSets is successful.
Pods
Displays the Pods installed by the K2HR3 Helm Chart.
In the left pane, select Workload > Pods to confirm.
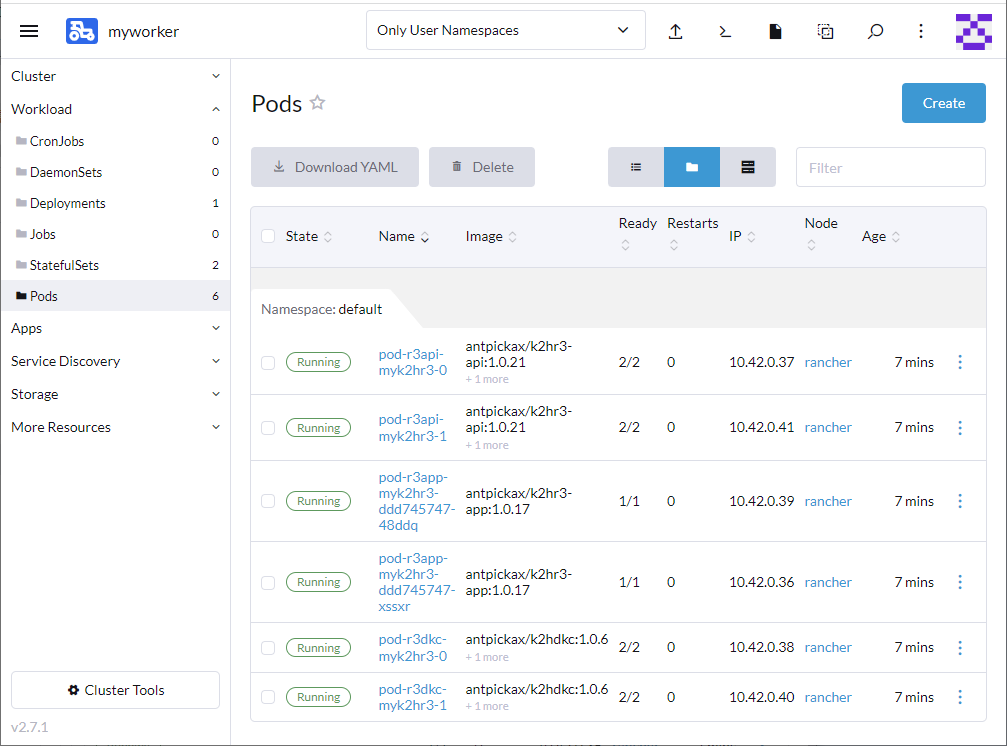
If you see A total of 6 pods, pod-r3api-myk2hr3-[0,1], pod-r3app-myk2hr3-[xxx,yyy] and pod-r3dkc-myk2hr3-[0,1](case of Name=myk2hr3) and the Running badge on the both of them, then Pods is successful.
Check K2HR3 System
Check the operation of the installed K2HR3 system.
Use the External hostanme or IP address and External port number set in the K2HR3 Web Application and the K2HR3 REST API.
K2HR3 REST API
First, check access to the K2HR3 REST API.
The K2HR3 REST API is a REST API server accessed from the K2HR3 Web Application, so you need to check it first.
Use the Hostname set in External hostanme or IP address.
You also need to know the port number set in External port number.
External port number is not a required setting item, so if it is not set, it will be 31443.
From your browser, access to following URL:
https://<Hostname>:<Port number>/
Using the example explained so far, the URL will be as follows:
https://node1.mycluster.localhost:31443
If you can successfully access to K2HR3 REST API, you will see the following text:
{"version":["v1"]}
Notes
The K2HR3 system installed by K2HR3 Helm Chart uses a self-signed certificate(TLS).
Therefore, when you try to view it in a browser, you get an error such as Your connection is not private.
Please allow access from Hide advanced button.
(The above is the wording displayed on Google Chrome, so please operate according to your browser.)
K2HR3 Web Application
Next, check access to the K2HR3 Web Application.
Use the Hostname set in External hostanme or IP address.
You also need to know the port number set in External port number.
External port number is not a required setting item, so if it is not set, it will be 32443.
From your browser, access to following URL:
https://<Hostname>:<Port number>/
Using the example explained so far, the URL will be as follows:
https://node1.mycluster.localhost:32443/
If you can successfully access to K2HR3 Web Application, you will see the following page.

Then click the button in the upper right corner and select Sign in to sign in.

If you can sign in normally, the icon indicating the sign-in status on the upper right will be displayed in white as shown in the screen below.
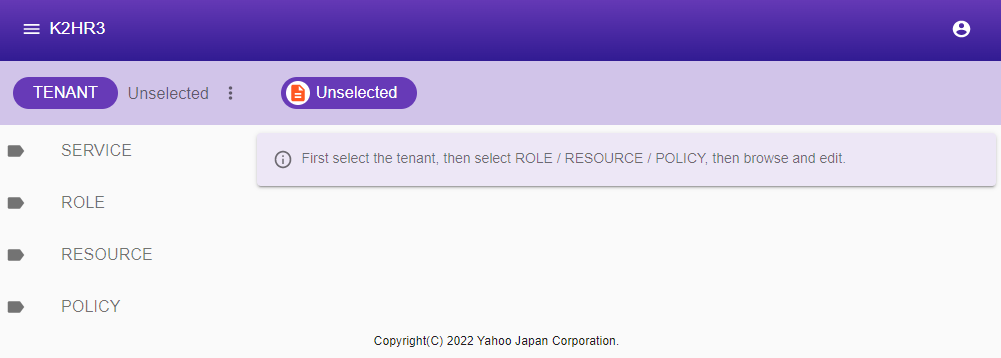
You have now confirmed that the K2HR3 Web Application and K2HR3 systems are working properly.
Notes
The K2HR3 system installed by K2HR3 Helm Chart uses a self-signed certificate(TLS).
Therefore, when you try to view it in a browser, you get an error such as Your connection is not private.
Please allow access from Hide advanced button.
(The above is the wording displayed on Google Chrome, so please operate according to your browser.)
Let’s up K2HR3 system
Now you knew how to install a K2HR3 system using RANCHER and K2HR3 Helm Chart.
In the above example, we installed the K2HR3 system by setting only the required items, but we can customize it further.
If you want to customize something other than what is shown in Install: Step 2, you can select Edit YAML and edit the value of values.yaml in K2HR3 Helm Chart directly.

The values you can change are the same as when customizing the K2HR3 Helm Chart using from the helm command.
For the definition and default value of each variable, refer to K2HR3 Helm Chart Option.
As described above, if you use K2HR3 Helm Chart as RANCHER Helm Chart in RANCHER, you can easily install a K2HR3 system.
Helm Chart Usage Usage Other